Lists of frequently asked questions
Anti-virus
Installation
How can I install anti-virus?
Prior to the installation, we strongly recommend doing the following:
- Install all the critical updates released by Microsoft for your operating system (updates can be downloaded from the Microsoft update site);
- Use system tools to check the file system and fix problems, if any;
- Close other running applications.
To run the installation in normal mode, use one of the following:
- If the installation kit is a single executable file, launch the file.
- If the installation kit is furnished on a branded disk, insert the disk into your optical drive. If autorun is enabled, the installation procedure will start automatically. If autorun is disabled, launch the autorun.exe file located on the disk. The autorun window will appear.
Then proceed with the following steps:
- Press Install.
Follow the installation wizard instructions. At any installation step before file copying process is started you can use the two buttons:
- Press Back to return to the previous step;
- Press Next to move to the next step;
- Press Cancel to cancel the installation.
How can I know the version of the anti-virus I have installed?
In order to check the version number, right-click on the Dr.Web icon in the notifications area and select About. In the next window, you will see the Dr.Web version number and all the modules versions as well.
How do I install the anti-virus?
Before you start installing Dr.Web Security Space, review the system requirements (see system requirements for version 12.0). In addition, we recommend that you:
- install all critical updates released by Microsoft for your operating system (read more about the Windows updating process);
- if the manufacturer has discontinued support for your operating system, it is recommended that you upgrade to the latest version of the operating system;
- use system tools to check the file system and fix discovered problems;
- remove any other anti-virus programs to prevent their components from possibly conflicting with Dr.Web’s components;
- if you are going to install Dr.Web Firewall, you need to remove other firewalls from your system;
- close all running applications.
Dr.Web’s installation must be performed by a user who has administrative privileges on the given computer.
Dr.Web is incompatible with proactive protection products from other manufacturers.
The installation instructions for standard mode (using both the installation file and the Dr.Web CD) can be found in the documentation here.
How to upgrade from Dr.Web Anti-virus to Dr.Web Security Space free of charge
Replace your license key for free to be able to use all the features of Dr.Web Security Space.
! A Dr.Web Anti-virus license key can also be used for Dr.Web Security Space, however the components included in Dr.Web Security Space but absent in Dr.Web Anti-virus will not work with the Dr.Web Anti-virus license key.
The list of these components:
- Spider Gate
- Device access rules
- Parental Control
- Data Loss Prevention
To replace your key, sign in to your My Dr.Web Portal for home (from the program or via the site), and in the active license's area of the License section—Active, click on Upgrade to Dr.Web Security Space free of charge.
An email containing your new serial number and key file will be sent to your address. Read it.
! Free key replacement is only possible for Dr.Web Anti-virus licenses or Dr.Web Anti-virus + cryptographer licenses that are active (valid) at the moment of replacement.
! If you have a license that has not yet been activated, just register it—you'll be given a Dr.Web Security Space license immediately and you won't need to replace it.
! Once your license is replaced, your old license will be blocked in 30 days.
Install Dr.Web Security Space. To do this:
Download the Dr.Web Security Space distribution file. To do this, in your license's area of My Dr.Web Portal, click on "Download".
Place the license key file in the same folder with the Dr.Web Security Space distribution file.
Uninstall Dr.Web Anti-virus for Windows; to do this, open:
- Windows 10
Click on "Start" - "Parameters" - "Applications". - Windows 8 / 8.1
Press "Win" + "X". In the newly appeared list, select "Programs and components". - Windows Vista / Windows 7
Go to "Start" - "Control panel" - "Remove Programs". - Windows XP
Go to "Start" - "Control panel" - "Add and Remove Programs".
Find Dr.Web Anti-virus for Windows on the application list; select it, and click on "Uninstall".
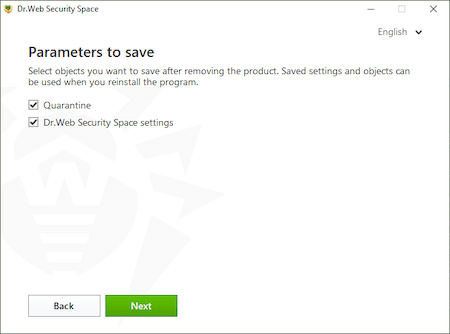
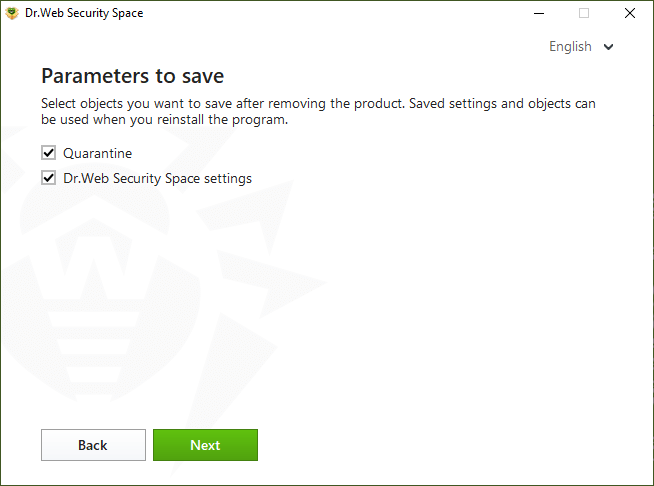
To transfer custom Dr.Web component settings to Dr.Web Security Space, do not clear the box "Dr.Web Anti-virus for Windows settings" in the "Parameters to save" window.
Click on "Next".
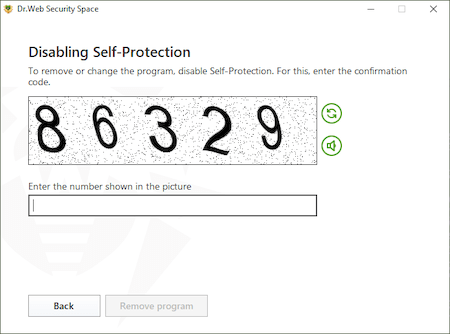
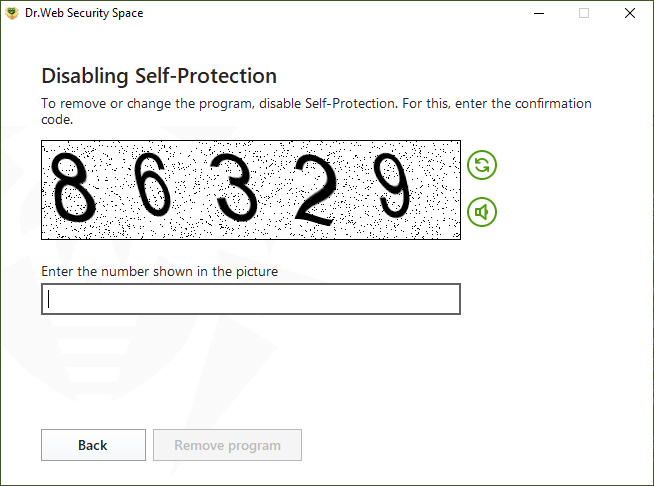
Enter the CAPTCHA code and choose to uninstall the application.
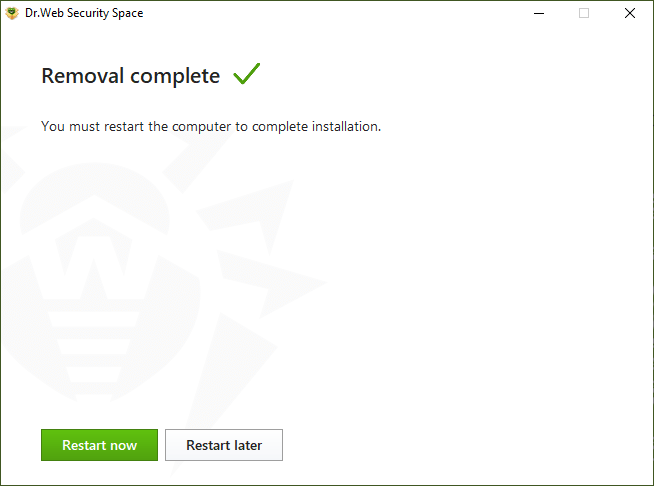
Wait for the Dr.Web Anti-virus uninstall process to complete and make sure that you restart the computer.

Install Dr.Web Security Space. To do this, open the distribution file.
Confirm the system prompt to elevate privileges to administrator ones.

If you want to change the list of components to be installed, for example, to add the Firewall, which is not installed by default, click on "Installation parameters".
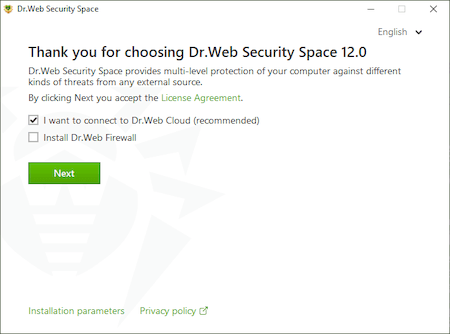
Click on "Next".
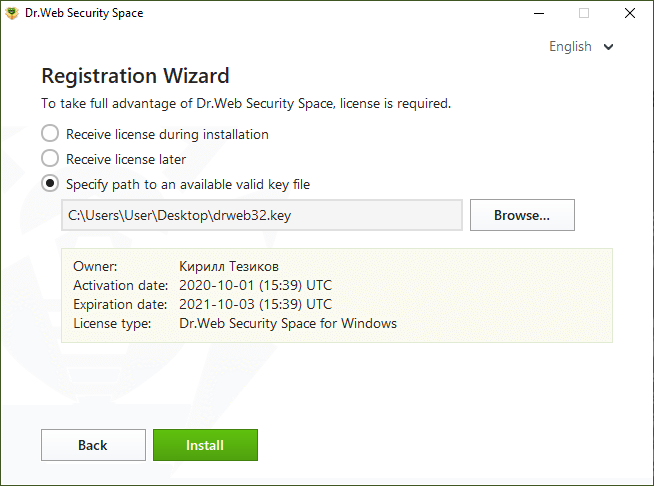
The license file will be found automatically if it is located in the same folder with the distribution file.
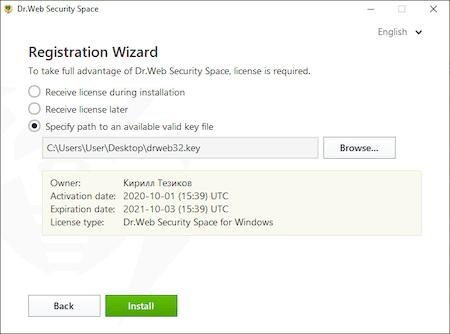
Otherwise, click on "Browse" and specify the file's location.
Click on "Install" and wait for Dr.Web to finish installing to Dr.Web Security Space.
Once installation is complete, restart the computer.
- Windows 10

I have purchased Dr.Web Anti-virus license.Which of your products shall I install?
When purchasing our anti-virus, you obtain a certificate indicating which product the license you have bought is applied to. So, you need to install the product indicated.
I want to reinstall an operating system. My Dr.Web license has not expired yet. How can I recover my Dr.Web license on the new OS?
There are two ways to do it:
- Disable anti-virus self-protection (right-click on the Dr.Web icon in the notifications area, select Disable self-protection, enter digits from the CAPTCHA and press Disable self-protection), then copy the drweb32.key key file from C:\Program Files\DrWeb (or the anti-virus installation folder) to a removable media. After that, locate the drweb32.key file path during the anti-virus installation the new OS.
- Download the latest Dr.Web version from our website and launch the installation. During the installation, enter your serial number; the key will be downloaded and installed automatically.
My notebook CD-DVD drive is absent/broken. How can I install box version of anti-virus I have purchased?
In this case, you need to download the latest anti-virus distribution file from our website and install it.
What is the difference between default and custom installations?
In default installation, all the anti-virus package components are automatically installed into C:\Program Files\DrWeb\ folder.
In custom installation, you can specify the list of components to be installed (e.g. you may choose not to install a firewall if you don’t need it), select installation folder and configure update server.
When installing anti-virus, I see the following message: “Instmsi30.exe not found”. What am I to do?
To have this error fixed, you need to download and install an update for Windows, and then restart anti-virus installation.
Why can’t I keep another anti-virus on my PC while installing Dr.Web?
It is not allowed to install several anti-virus programs on one PC at a time — they will conflict with each other that may considerably slow down you PC or make it completely non-operational. If you have an anti-virus software already installed on your PC, but intend to install a new product from another vendor, then you need to remove the anti-virus program you have, prior to the installation.
If you wish to install another anti-virus program, you do it at your own risk, and become responsible for all the consequences because the consequences of such installation might be unpredictable including inability of your OS to boot as a result of two or more anti-viruses installed on your PC.
I installed the Dr.Web anti-virus. During the installation process, it was supposed to disable the built-in Windows Defender anti-virus. However, it remains active. Why?
After you install any vendor’s anti-virus, Windows Defender is not disabled; it switches to the passive mode. This option is regulated by Windows; no anti-virus installed in your system (including Dr.Web) can affect Windows Defender's operation. This is one of Microsoft's requirements.
Instructions on how to disable Windows Defender can be found here. If you face problems while disabling Windows Defender manually, please contact our technical support service.
Removal
Can I always use Dr.Web Remover? It is really faster!
The utility is not designed to be used as a main Dr.Web software uninstallation tool. Dr.Web Remover utility is a damaged Dr.Web version emergency removal tool. The anti-virus is recommended to be uninstalled with the standard Windows tools.
Due to a system error, the anti-virus turned damaged and cannot be removed. How can I fix it?
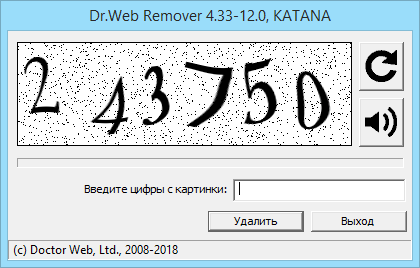
If the installed version of Dr.Web Anti-virus was damaged for some reasons and cannot be removed in a regular way — please use the Dr.Web Remover emergency removal utility. Run Dr.Web Remover, enter the code from the CAPTCHA (it is necessary in order to confirm that is the user, not application, who attempts to remove antivirus) and press Remove.
I need to remove anti-virus. What shall I do?
Like any other program, Dr.Web Anti-virus can be removed with standard operating system tools:
- In Windows 2000/XP: From Menu–>Control Panel–>Add/Remove programs.
- In Windows Vista/7: From Menu–>Control Panel–>Programs and Features.
If you were unable to remove the anti-virus in such a way, please use a special Dr.Web Remover utility, which can be downloaded here.
Which products can I remove with the Dr.Web Remover utility?
Dr.Web Remover is intended to be used to delete the results of incorrect/damaged installations of Dr.Web for Windows. The supported versions are 4.33, 4.44, 5.0, 6.0, 7.0, and 8.0. The utility can also be used with the same versions of Dr.Web Enterprise Suite client software when standard removal tools are not available or do not work.
I have problems when I try to uninstall the Dr.Web anti-virus. What should I do?
If you are finding it impossible to uninstall Dr.Web using standard Windows tools, use the Dr.Web Remover emergency removal utility, which can be downloaded here:
https://download.geo.drweb.com/pub/drweb/tools/drw_remover.exe.
Run the downloaded file. Enter the CAPTCHA code (this is necessary in order for Dr.Web self-protection to be disabled) and click on Remove. After the process is complete, you need to restart your PC.
If the uninstallation fails after using Dr.Web Remover, please submit a request to our technical support service.
Can I always use Dr.Web Remover? After all, it’s really faster!
The Dr.Web Remover utility is not designed to be used as the main Dr.Web software uninstallation tool. This utility is an emergency removal tool used for a damaged Dr.Web version. It is recommended that the anti-virus be uninstalled with the standard Windows tools.
Which products can I remove with the Dr.Web Remover utility?
Dr.Web Remover is intended for removing incorrect/damaged installations of Dr.Web for Windows. The supported versions are 4.33 — 12.0. The utility can also be used with Dr.Web Enterprise Security Suite client software of the same versions in cases when standard removal tools are not available or won't work.
Why does the Dr.Web anti-virus need to be restarted after some updates?
Doctor Web monitors new threats as they arise and promptly updates its products to ensure that they can protect against those threats. Many malicious programs try to hide deep in the bowels of the operating system at the driver level and launch while a system boots up in order to prevent security tools, including anti-viruses, from detecting them. To neutralise threats of this kind, Dr.Web’s drivers are installed on a layer below the system drivers and thus thwart all malware attempts to penetrate the system.
Windows is designed in such a way that a system restart is required to update a driver.
For detection routines to be updated or urgent updates that provide protection from brand new threats to be applied, a system must be restarted because new Dr.Web interception drivers can only be installed after the reboot.
The WannaCry outbreak is a good example of how a threat can be neutralised while it is being downloaded even on Windows PCs whose security loopholes are unpatched. The trojan wasn't able to exploit vulnerabilities because the anti-virus intercepted the malicious code on Dr.Web-protected machines.
IMPORTANT! Starting with Windows 8.0, turning off a PC and turning it back on is no longer enough—it is imperative that a system be restarted! This is critical because often after installing updates, users merely power off their computers for the night and power them on again in the morning. The update prompt pops up again, and users regard it as an error. In reality, Windows 8.0 and later versions behave differently—when Windows starts, it creates a system image and later on restores itself from the image whenever the computer is turned on. This significantly reduces a PC’s start-up time because the drivers (including those of the anti-virus) don't need to be loaded all over again.
How to upgrade Dr.Web
|
If you have Windows XP We recommend that you update your anti-virus to version 11.5. |
If you have a different OS, We recommend that you update the anti-virus to the latest version (you can check what the latest available version is in the Download Wizard). |
|
1. Download the latest Dr.Web version.
In the browser address bar, type www.drweb.com. The Download Wizard will appear. Enter your serial number and registered email address, and click on the Download button. In the newly appeared window, the download option for Windows and Android is already selected, so you can just click on the Send button. |
|
|
2. In the next step, select version 11.5 and download it. |
2. In the next step, select the latest version and download it. |
|
3. Remove your outdated version of Dr.Web. Sequentially, select Start → Search. In the newly appeared window, enter Control Panel. Next, depending on the Control Panel view and your Windows version, select Remove Programs, Add and Remove Programs, or Programs and Features. After making a list of installed software, select the anti-virus and click on Remove. Follow the instructions of the Removal Wizard. During the removal process, you will be prompted to save the settings you made earlier. We recommend that you save them.. ! If the anti-virus is not on the list of installed software or for some reason was not completely uninstalled, we recommend that you use the uninstall utility at https://download.geo.drweb.com/pub/drweb/tools/drw_remover.exe |
|
|
4. Install the previously downloaded Dr.Web distribution package. During installation, specify your license. The key is downloaded and installed into the program automatically. |
|
How to check whether the virus databases are up to date.
Click on the anti-virus icon in the system tray: select the second menu item from the bottom — Update. The standard status is "Update is not required". There is also a button for a manual update (Update).
Exclusions
What can I configure in the Exclusions section of Dr.Web’s settings?
The Exclusions section lets you launch legitimate applications whose ability to work could be hindered by the anti-virus as well as open websites that interest you but may be on the list of non-recommended sites.
You should not add Windows system directories, temp folders, torrent-tracker sites, file catalogues, or sites hosting illegal software and video content.
You should not add Windows system directories, temp folders, torrent-tracker sites, file catalogues, or sites hosting illegal software and video content.
Which Dr.Web scanning options and restrictions can't be changed or removed?
Any option can be changed, and any restriction can be removed.
Important! The more exceptions you add in the anti-virus settings and the fewer restrictions you set for applications and websites, the lower the system security will be.
What should I do if the anti-virus displays a threat warning whenever I try to open a link or start an application even though I'm certain that it’s from a trusted source and is 100% infection-free?
You should be very attentive to the danger notifications displayed by the anti-virus since any initially reliable sources can be compromised (hacked, forged, etc.).
If you would like to report a false positive, please use the form at this link.
When should I disable an anti-virus component (e.g., SpIDer Gate) rather than keep adding items to the Exclusions?
Under normal circumstances, you should never do that. Disabling Dr.Web components can be very dangerous: while SpIDer Gate is disabled, the anti-virus isn't scanning traffic.
How can I visit a site that Dr.Web says I shouldn’t access?
Go to Security Center → Exclusions → Website, and add the URL to the list.
When can I use file and directory patterns to specify exceptions (e.g., C:\folder\*)?
The main scenarios for using masks when configuring exclusions are:
- Adding to the exclusion list sites that fall under a specified general condition (in this case, the matching part of the domain name). For more information, refer to the current documentation (examples of using masks are available in the section "To add domain names to the list" when you click on the "Details" link).
- Adding files and folders of a specific kind to the exclusion list. For more information, refer to the current documentation (examples of using masks are available in the section "To add files and folders to the exclusion list" when you click on the link "More about masks").
- Adding applications of a specific kind to the exclusion list. For more information refer to the current documentation (examples of using masks are available in the section "To add applications to the list" when you click on the link "More about masks").
What should I do if the anti-virus keeps checking a legitimate program that is working normally. This is impacting system performance.
- Make sure that you are using the latest version of your anti-virus (How do I check the version? ).
- Make sure that the requirements for the system on which the anti-virus is installed are being met.
- Contact our technical support. Attach to the request a report from the system in which the anti-virus is installed. To do this, right-click on the Dr.Web icon in the system tray, open Security Center -> Support
 , click on "Go to Report Wizard", and then click on "Create report". Wait for the report-generation process to complete. A file with a .zip extension is generated—attach it to your request.
The Dr.Web Report Wizard (the dwsysinfo application) is a special Dr.Web utility for collecting system information. The utility generates a zip archive containing event logs, XML documents, the HOSTS file, and other information. The full list of data available in the report can be found here.
What can I do if the anti-virus conflicts with an application or prevents it from being started?
There are non-malicious programs that, due to their specifics, require additional configuration to operate in a system that has a running anti-virus (a well-known example is Steam). Check the documentation to see whether such limitations exist for the program with which the problem has occurred.
If necessary, you can add the program to the exclusion list.
Please note that the decision to add any program to the exclusions is at your own risk.
Right-click on the Dr.Web icon in the system tray, and select Security Center. Go to the Statistics tab, and select Detailed Report. In the newly opened window, click on the event you are interested in. Look through the list to find information about the site or program being blocked. Add the URL or file/application to the exception list being used by the component that has been blocking it.
- If the problem persists, please contact our technical support service. Attach to the request a report from the system in which the anti-virus is installed. To do this, right-click on the Dr.Web icon in the system tray, open Security Center -> Support , click on "Go to Report Wizard", and then click on "Create report". Wait for the report-generation process to complete. A file with a .zip extension is generated—attach it to your request. Specify the approximate time the blocked program was launched.
The Dr.Web Report Wizard (the dwsysinfo application) is a special Dr.Web utility for collecting system information. The utility generates a zip archive containing event logs, XML documents, the HOSTS file, and other information. The full list of data available in the report can be found here.
When I try to open a "clean" file, the anti-virus notifies me about malware. What can I do?
Go on Doctor Web’s site to find out more about the threat that’s been detected, and check whether the troubleshooting section in the application's documentation contains any mention of possible issues related to the anti-virus software. Then allow the application to be launched or block its launch. If you can't decide what to do, you should contact our support service.
If a certain website is on both the Parental Control's blacklist and the exceptions list, will I be able to access it?
Access to the site will be denied, and the block page will be displayed.
If a threat was detected and I already closed the notification window, how can I learn which component detected it?
In the system tray, click on the Dr.Web icon, and select Security Center. Go to the Statistics tab, and select Detailed report.
Where can I find the anti-virus settings so that I can exclude specific sites and folders from Dr.Web scans?
Exceptions are defined separately for each component. To access the settings, go to Security Center → Exclusions. Some options can be changed in the component settings (Devices and Personal Data, Parental Control, Preventive Protection).
How can I change an application's permissions in the system?
Go to Security Center → Exclusions; specify the application as an exception for all the components, or define the application's parameters in the Preventive Protection settings.
Updating the anti-virus and virus databases
What’s the difference between updating the anti-virus components and updating the virus databases?
Both are aimed at keeping the anti-virus current to protect a computer against any and all threats, including the latest ones. The difference is that when only the virus databases are updated, you don’t need to reboot the system, but when the anti-virus components are updated, rebooting may often be necessary. We strongly recommend that you act on Dr.Web reboot notifications related to component updates because out-of-sequence updating may lead to a weakening of protection.
Why does Dr.Web ask users to reboot when updating components?
Rebooting is needed so that the updated Dr.Web drivers work properly with the operating system. Our competitors’ anti-virus solutions are updated in the same manner.
How often do Dr.Web anti-virus programs require a reboot?
Doctor Web strives to release Dr.Web component updates, especially critical ones, as quickly as possible. After all, the reliability of the protection directly depends on the anti-virus’s ability to intercept and cure the latest threats and still operate error free. Experience shows that for each individual product, updates that require a reboot are being released no more than once or twice a month, the only exception to this being recently released program versions and those under active development.
What should I do if an anti-virus update requires a reboot but I can’t do it right now?
In the window that notifies users that a reboot is required, you can choose when you want the system rebooted. You can choose to do it now or postpone it until a time convenient for you.

Why are there fewer entries in the Dr.Web virus database than in the databases of some other anti-virus programs?
Just one Dr.Web database entry can lead to the detection of tens, or hundreds, or sometimes even thousands of similar viruses.
Moreover, the presence of Origins Tracing™ and structural entropy analysis in the Dr.Web anti-virus makes it possible to detect malicious programs that are so new they have yet to undergo analysis in the Doctor Web anti-virus laboratory.
The smaller number of virus entries (compared to some other anti-virus programs) even makes it possible to detect unknown viruses (i.e., those not in the virus database) with a high degree of certainty. These are viruses that will be created on the basis of existing viruses.
How do users benefit from the small size of the virus database and the fewer number of entries in it?
- Hard drive space is conserved
- RAM is conserved
- Less Internet traffic is used when updates are downloaded
- The virus database can be downloaded at high speed, and it can operate quickly when analysing viruses
- Future viruses, those that will be created in the future by modifying existing viruses, can be detected
Thus, the fundamental difference between the Dr.Web virus databases and the virus databases of other anti-virus programs is that with its fewer number of database entries, the Dr.Web database allows as many (or even more) viruses and malicious programs to be detected.
How much does an expanding virus database impede the anti-virus’s search for malicious objects?
Virus databases do indeed get larger with each update. But Dr.Web solutions use the most cutting-edge anti-virus database format so that as the virus databases get bigger, scan speed is not reduced.
Moreover, because the latest technologies are applied to Dr.Web solutions, the size of the virus databases can be reduced. This is because they exclude entries containing information about malicious programs that are automatically detected with the help of the newest technologies.
Is there some utility that can update the anti-virus automatically, and how can I set this up?
When an Internet connection is present, the anti-virus updates every 30 minutes by default (this is the most optimal setting).
When required, you can change this setting by doing the following: right-click on the Dr.Web icon located in the bottom-right corner of the system tray. Then, in the context menu, select Tools → Settings and go to the Updating tab.
Alternatively, you can update the anti-virus manually by right-clicking on the Dr.Web icon in the bottom-right corner of the system tray, and then selecting Updating in the context menu.
I’ve heard that when I buy the Dr.Web anti-virus, I’m only paying for a copy of the software program, and that I will have to pay over and over again for anti-virus database and module updates. Is that true?
No, that’s not true. When you buy the anti-virus, you are paying not only for the program itself, but also for the right to get anti-virus database and module updates as well as the opportunity to contact the technical support service while your license is valid. Nobody will ever come after you for additional money! Proof of this can be found in the Dr.Web license agreement which you are invited to read before you install the anti-virus. Doctor Web assumes a number of obligations and guarantees the following:
‘Throughout the entire software usage period, the User is granted the right to receive through the Internet virus database updates as well as upgrades of the software modules as they are made available by the Rights Holder’.
The Dr.Web license agreement is a legal document that guarantees your rights as a consumer.
Why do you recommend updating the anti-virus EVERY TIME the computer is connected to the Internet?
Hundreds of thousands of new viruses appear DAILY — and correspondingly, tens of thousands appear every hour. The overwhelming majority of them are modifications—brothers and sisters of existing viruses. Yes, the Dr.Web heuristic analyser and the Dr.Web behavioural analyser really do make it possible to detect with a high degree of probability that a file has been infected or is a Trojan itself. But “probably infected” does not mean “infected for sure”! This file will be declared a virus only after its virus signature has been added to the Dr.Web virus database.
But no anti-virus software vendor will ever guarantee you that today won’t be the day that somebody writes a brand new virus that can’t be detected by even the most perfect heuristic analyser.
As a rule, malicious programs reach their victims at the same time they reach the Doctor Web anti-virus laboratory for analysis, and in the case of the newest malicious programs (those not yet detected by any available mechanism), anti-virus analysts need time to develop and test a “cure”. Frequent updating makes it possible to minimise the time it takes for potential victims of criminal attacks to get hold of updates. Often ‘cures’ for malicious files are available, but have not yet been downloaded.
Unlike its competitors, Doctor Web’s principled position is to release updates as frequently as possible so as to minimise the time period during which new threats can pose a danger.
That is why the anti-virus databases need to be updated every time the computer is connected to the Internet or as frequently as possible if the connection is continuous.
I can’t update Dr.Web; I’m getting an update error message. What should I do?
First do the following:
- Make sure that your computer is connected to the Internet.
- If you are using a firewall, go into its settings and allow the drwupsrv.exe update module, located in the folder containing the installed Dr.Web software, to access the Internet.
- If you access the Internet through a proxy server that requires authentication with a username and password, go to the settings and specify the proxy server’s address and port, and the username and password for it. To do this, right-click on the Dr.Web icon in the notification area, and select Tools –> Settings. In the next window, go to the Proxy server tab and configure the proxy server settings.
If after trying the above, you are still experiencing difficulties, please contact the Doctor Web technical support service and describe in detail how your computer connects to the Internet (note: if a proxy server is involved, please specify whether authentication is required, and whether your browser or Dr.Web update module is configured to be used via the proxy server).
The update mirror and its configuration
What is the update mirror?
The update mirror is the folder to which update files are copied. The update mirror can be used as the Dr.Web update source for other local network computers that are not connected to the Internet.
How is the update mirror configured via the anti-virus interface?
Click on the Dr.Web icon in the system tray, and in the Dr.Web menu, select Security Center;
- Click the padlock icon to allow the changes and click on the gear icon (Settings)
- Go to the Update tab and select Additional settings.
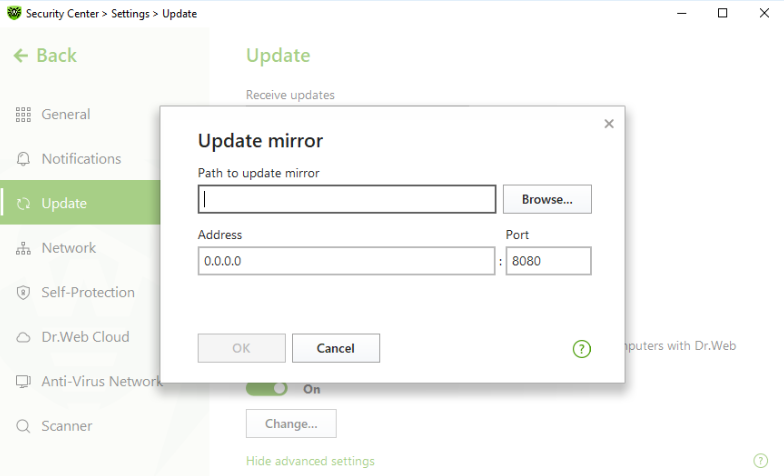
- Toggle the switch Update mirror to the On position. The mirror configuration window will open:
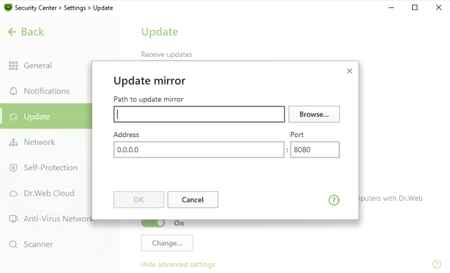
- Click on Browse and specify the folder to which updates are to be saved. It will be the update source for the other PCs in the local network.
- Address – is the address of the PC in the local network that will be used as the address for updating, via the anti-virus network, the other PCs in this network. Port is the port number that will be used to distribute updates.
- If your computer is connected to several subnets, you can specify an IP address that will only be accessible to one of the subnets. You can also specify the port on which the HTTP server will receive connection requests.
- In the Address field, specify the host name or IP address in IPv4 or IPv6 format.
- In the Port field, specify any free port.
How is the update mirror configured manually?
First, on any computer with Internet access, copy the following 3 files—take them from a computer on which a standalone anti-virus requiring updating is installed:
- drwupsrv.exe (the update utility). In the 11th and 12th versions of Dr.Web, it is located in the directory: C:\Program Files\Common Files\Doctor Web\Updater. When copying it to a PC running a 32-bit OS, it is important that the file bit also be 32-bit. For a 64-bit system, bit agreement is not required.
- drwzones.xml (a file with update zones). In the 11-th and 12-th versions of Dr.Web, it is located in:
- for Windows XP — C:\Documents and Settings\All Users\Application Data\Doctor Web\Updater\etc
- for Windows Vista/7/8/8.1/10 — C:\ProgramData\Doctor Web\Updater\etc - The license key file.
- For users of commercial licenses for business products – agent.key.
- For users of home versions – drweb32.key.
- It can also have the format SL123456789.key and be placed in the anti-virus installation directory, which by default is C:\Program Files\DrWeb.
The key file can be downloaded from the email received after the initial serial number registration; in some cases — from the anti-virus installation directory C:\Program Files\DrWeb.
These files are necessary and sufficient to start creating an update mirror. In the example below, all of these files will be saved in the folder C:\mirror on a PC with Internet access.
The update utility has several operating modes and a myriad of parameters, which are described in the documentation. After placing all the above-mentioned files in the correct directory (in this case, C:\mirror), you must run the command prompt as administrator and set the following command in it:
C:\mirror\drwupsrv.exe -c download -s 90 --zones=C:\mirror\drwzones.xml -r C:\mirror\repo --key-dir=C:\mirror --data-dir=C:\mirror -l --log-dir=C:\mirror --verbosity debug
The parameters and their description
| -c [ --command ] arg (=update) |
The executable command: getversions — get versions, getcomponents — get components, update — update, uninstall — remove, exec — execute, keyupdate — update the key, download — download. In our case, the update mirror must first be downloaded. Accordingly, the download mode is used for downloading. |
| -d [ --data-dir ] | The path to the directory where the current product repository is located. In practice, indicating this parameter is very important if any version of the Dr.Web anti-virus is already installed on the PC where the mirror is being created. |
| --key-dir arg | The directory serving as the location of the current key, without which the download from the zone will be impossible. If the parameter is omitted, the key is taken from the directory in which the updater itself is located. |
| -l [ --progress-to-console ] | Display information in the console about the update utility’s operation. It can be convenient to track the updating process or the mirror’s creation in real time. |
| --log-dir arg | Sets the utility’s regular log location directory with the default name — dwupdater.log. If this parameter is not specified, the log will still be recorded, but in its regular directory C:\ProgramData\Doctor Web\Logs, which is not always convenient.
|
| -r [ --repo-dir ] arg | The repository folder in which the update mirror will be downloaded. By default <data_dir>/repo |
| -s [ --version ] arg | The name of the product list version. For all product versions, starting with 9.0, this parameter is 90. That means that this parameter will always be equal to 90 for 10.0, 11, 11.5, or 12.0. |
| -v [ --verbosity ] | Sets the update utility’s log verbosity. It can have the following values: error (standard), info (advanced), debug (debugging). |
| --zones arg | The path to the file containing a list of update areas (drwzones.xml). This tells the update utility where to download the mirror from. |
Connecting via a proxy server
Option -g [ --proxy ] lets you specify the address of a proxy server for updating in the format <address>: <port>. Example
-g 11.22.33.44:3128

--proxy=11.22.33.44:3128
If, on the PC where the mirror is being created, a proxy server is used when connecting to the Internet, when you start creating the mirror from the command line, you need to set additional parameters:
C:\mirror\drwupsrv.exe -c download -s 90 --zones=C:\mirror\drwzones.xml -r C:\mirror\repo --key-dir=C:\mirror --data-dir=C:\mirror -l --log-dir=C:\mirror --verbosity debug --proxy=11.22.33.44:3128 --user=qwerty --password=qwerty
The parameters -u [ --user ] и -k [ --password ] allow you to specify the proxy server login and password, if available. Example:
-u qwerty -k qwerty

--user=qwerty --password=qwerty
How is the update source configured on a target PC via the anti-virus interface?
- Click on the Dr.Web icon in the system tray, and in the Dr.Web menu, select Security Center.
- Click the padlock icon, allow the changes, and click on the gear icon (Settings).
- Go to the Update tab (or General → Update for version 11), and in the Update source section, click on Change.
- Specify the option Local or network folder (it contains the files of the created update mirror). For network folder, you need to specify a user name (account login) and password, if one has been set.
Correct:
Test-PC\AdministratorWrong:
AdministratorYou can find out the name of the current computer in a variety of ways. The fastest one is the shortcut Win + Pause break. In the System Properties window – Computer name. You can also open the properties of any shortcut or file and go to the tab Details or Security. Another way to find out a local computer’s name is using the hostname command. You can find out the name of a remote computer by running ping with the parameter -a, for example: ping -a 11.22.33.44
In the Update source section, you can also select the option Anti-Virus Network. In the opened line, select the local address of the computer on which the Dr.Web product is installed and the update mirror is configured.
How is updating initiated from the mirror using the command line?
Similar to the download mode (download) the utility also has the update mode (update) and a corresponding set of parameters, some of which are unique for this mode.
To run the utility in the update mode, the parameter -c [ --command ] with the update value is used.
To initiate updating from the mirror that is, in this example, located in the folder C:\mirror\repo:
C:\mirror\drwupsrv.exe -c update -r C:\mirror\repo -l --log-dir=C:\mirror --verbosity debugImportant! Updating the anti-virus from the mirror using the update utility in command line mode has its own characteristics. The anti-virus installed on the computer will not record such a launch of the update utility. The databases and components will be updated, but the main control anti-virus service "will not find out" about it. Similarly, only using the update utility log can you find out whether the updating process occurred correctly. It follows from this that when using a similar way to update the product, you may receive the error "The virus databases are outdated", when in fact they will be updated. This feature is related to the anti-virus architecture. Launching the update utility separately from the control services is a process that is required only for service purposes.
Usually, it is recommended that you use the standard way to update via the interface.
What are the features of the updating process for certified Dr.Web versions?
Certified versions can be updated using one of two methods:
- Via the mirror created by a certified version of the product.
- Using the drwzones.xml file that leads to certified zones.
Versioning and the originality of files is very important if a certified product is installed on an isolated computer. Updating a certified version via the mirror that was created by the actual (release) version of the anti-virus will change the checksums of the executable files and lead to the loss of Information Security System certification status. The drwzones.xml file, taken from the anti-virus that was installed from a certified distribution, will contain its own update zone. During the mirror creation process, it will be used to load database and component updates. Using a release drwzones.xml will lead to the loss of the certified status.
How is file integrity ensured during transfer?
To minimise the risks of damaging files when transferring them manually to the directory from which updates will be downloaded, we recommend using a file manager with a binary data transfer mode when transferring a folder. An alternative solution is to transmit files in an archive.
Updating the anti-virus on a PC that has no Internet access
Install the non-centrally managed version of Dr.Web by using the User Manual (the installation instructions for versions below 12.0 can be found here).
- How is the update source configured on a target PC via the anti-virus interface?
- How is the update mirror configured manually?
Update the anti-virus on computers, using the obtained repository.
Restarting your system properly after an anti-virus update
Anti-virus update downloads can include updated anti-virus databases as well as application files. In the latter case, a system restart may be required to apply the update. And in this case, the corresponding notification will appear.
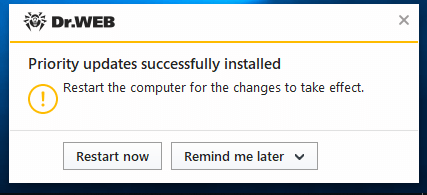
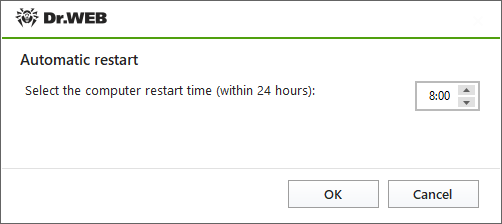
The user can restart the system immediately—by closing all the running applications and pressing the Restart now button. They can also make the anti-virus show the notification later or schedule a system restart. To use either of the two latter options, first select Remind me later.
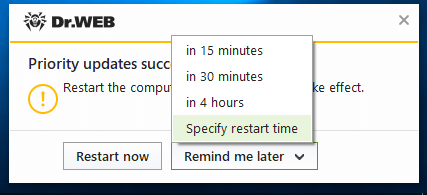
You can set the reboot time to occur within the next 24 hours.
Users are also able to restart the system on their own whenever they want. For example, go to Start → Shut down or sign out→ Restart/Shut down.
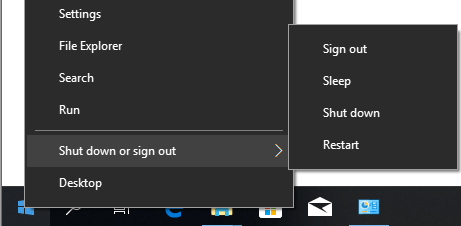
Important! Selecting the option to enter sleep mode or switching user accounts won't restart the system so that the pending updates are applied.
Important! Pressing the power button on a tablet or laptop will make the device enter sleep mode. To apply updates, restart the system using any of the available methods (including the restart option in the anti-virus notification pop-up).
Nothing found