Lists of frequently asked questions
The update mirror and its configuration
What is the update mirror?
The update mirror is the folder to which update files are copied. The update mirror can be used as the Dr.Web update source for other local network computers that are not connected to the Internet.
How is the update mirror configured via the anti-virus interface?
Click on the Dr.Web icon in the system tray, and in the Dr.Web menu, select Security Center;
- Click the padlock icon to allow the changes and click on the gear icon (Settings)
- Go to the Update tab and select Additional settings.
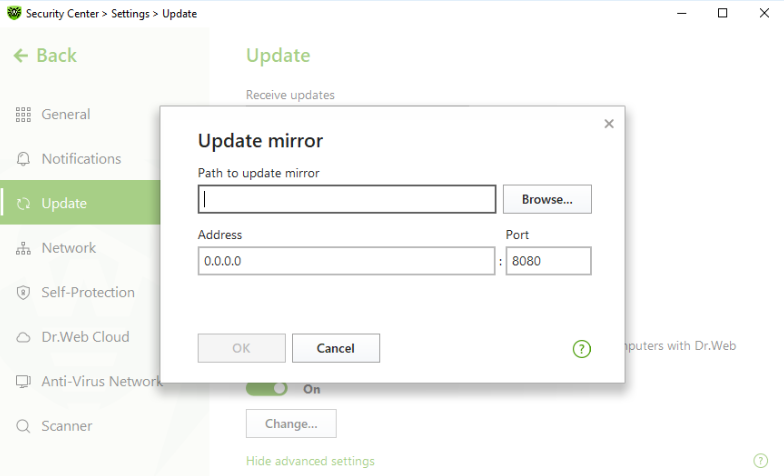
- Toggle the switch Update mirror to the On position. The mirror configuration window will open:
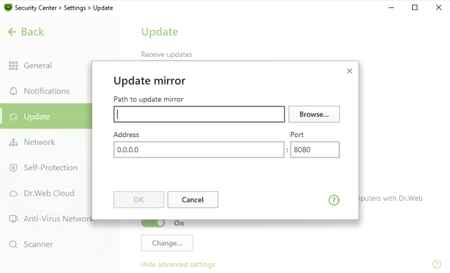
- Click on Browse and specify the folder to which updates are to be saved. It will be the update source for the other PCs in the local network.
- Address – is the address of the PC in the local network that will be used as the address for updating, via the anti-virus network, the other PCs in this network. Port is the port number that will be used to distribute updates.
- If your computer is connected to several subnets, you can specify an IP address that will only be accessible to one of the subnets. You can also specify the port on which the HTTP server will receive connection requests.
- In the Address field, specify the host name or IP address in IPv4 or IPv6 format.
- In the Port field, specify any free port.
How is the update mirror configured manually?
First, on any computer with Internet access, copy the following 3 files—take them from a computer on which a standalone anti-virus requiring updating is installed:
- drwupsrv.exe (the update utility). In the 11th and 12th versions of Dr.Web, it is located in the directory: C:\Program Files\Common Files\Doctor Web\Updater. When copying it to a PC running a 32-bit OS, it is important that the file bit also be 32-bit. For a 64-bit system, bit agreement is not required.
- drwzones.xml (a file with update zones). In the 11-th and 12-th versions of Dr.Web, it is located in:
- for Windows XP — C:\Documents and Settings\All Users\Application Data\Doctor Web\Updater\etc
- for Windows Vista/7/8/8.1/10 — C:\ProgramData\Doctor Web\Updater\etc - The license key file.
- For users of commercial licenses for business products – agent.key.
- For users of home versions – drweb32.key.
- It can also have the format SL123456789.key and be placed in the anti-virus installation directory, which by default is C:\Program Files\DrWeb.
The key file can be downloaded from the email received after the initial serial number registration; in some cases — from the anti-virus installation directory C:\Program Files\DrWeb.
These files are necessary and sufficient to start creating an update mirror. In the example below, all of these files will be saved in the folder C:\mirror on a PC with Internet access.
The update utility has several operating modes and a myriad of parameters, which are described in the documentation. After placing all the above-mentioned files in the correct directory (in this case, C:\mirror), you must run the command prompt as administrator and set the following command in it:
C:\mirror\drwupsrv.exe -c download -s 90 --zones=C:\mirror\drwzones.xml -r C:\mirror\repo --key-dir=C:\mirror --data-dir=C:\mirror -l --log-dir=C:\mirror --verbosity debug
The parameters and their description
| -c [ --command ] arg (=update) |
The executable command: getversions — get versions, getcomponents — get components, update — update, uninstall — remove, exec — execute, keyupdate — update the key, download — download. In our case, the update mirror must first be downloaded. Accordingly, the download mode is used for downloading. |
| -d [ --data-dir ] | The path to the directory where the current product repository is located. In practice, indicating this parameter is very important if any version of the Dr.Web anti-virus is already installed on the PC where the mirror is being created. |
| --key-dir arg | The directory serving as the location of the current key, without which the download from the zone will be impossible. If the parameter is omitted, the key is taken from the directory in which the updater itself is located. |
| -l [ --progress-to-console ] | Display information in the console about the update utility’s operation. It can be convenient to track the updating process or the mirror’s creation in real time. |
| --log-dir arg | Sets the utility’s regular log location directory with the default name — dwupdater.log. If this parameter is not specified, the log will still be recorded, but in its regular directory C:\ProgramData\Doctor Web\Logs, which is not always convenient.
|
| -r [ --repo-dir ] arg | The repository folder in which the update mirror will be downloaded. By default <data_dir>/repo |
| -s [ --version ] arg | The name of the product list version. For all product versions, starting with 9.0, this parameter is 90. That means that this parameter will always be equal to 90 for 10.0, 11, 11.5, or 12.0. |
| -v [ --verbosity ] | Sets the update utility’s log verbosity. It can have the following values: error (standard), info (advanced), debug (debugging). |
| --zones arg | The path to the file containing a list of update areas (drwzones.xml). This tells the update utility where to download the mirror from. |
Connecting via a proxy server
Option -g [ --proxy ] lets you specify the address of a proxy server for updating in the format <address>: <port>. Example
-g 11.22.33.44:3128

--proxy=11.22.33.44:3128
If, on the PC where the mirror is being created, a proxy server is used when connecting to the Internet, when you start creating the mirror from the command line, you need to set additional parameters:
C:\mirror\drwupsrv.exe -c download -s 90 --zones=C:\mirror\drwzones.xml -r C:\mirror\repo --key-dir=C:\mirror --data-dir=C:\mirror -l --log-dir=C:\mirror --verbosity debug --proxy=11.22.33.44:3128 --user=qwerty --password=qwerty
The parameters -u [ --user ] и -k [ --password ] allow you to specify the proxy server login and password, if available. Example:
-u qwerty -k qwerty

--user=qwerty --password=qwerty
How is the update source configured on a target PC via the anti-virus interface?
- Click on the Dr.Web icon in the system tray, and in the Dr.Web menu, select Security Center.
- Click the padlock icon, allow the changes, and click on the gear icon (Settings).
- Go to the Update tab (or General → Update for version 11), and in the Update source section, click on Change.
- Specify the option Local or network folder (it contains the files of the created update mirror). For network folder, you need to specify a user name (account login) and password, if one has been set.
Correct:
Test-PC\AdministratorWrong:
AdministratorYou can find out the name of the current computer in a variety of ways. The fastest one is the shortcut Win + Pause break. In the System Properties window – Computer name. You can also open the properties of any shortcut or file and go to the tab Details or Security. Another way to find out a local computer’s name is using the hostname command. You can find out the name of a remote computer by running ping with the parameter -a, for example: ping -a 11.22.33.44
In the Update source section, you can also select the option Anti-Virus Network. In the opened line, select the local address of the computer on which the Dr.Web product is installed and the update mirror is configured.
How is updating initiated from the mirror using the command line?
Similar to the download mode (download) the utility also has the update mode (update) and a corresponding set of parameters, some of which are unique for this mode.
To run the utility in the update mode, the parameter -c [ --command ] with the update value is used.
To initiate updating from the mirror that is, in this example, located in the folder C:\mirror\repo:
C:\mirror\drwupsrv.exe -c update -r C:\mirror\repo -l --log-dir=C:\mirror --verbosity debugImportant! Updating the anti-virus from the mirror using the update utility in command line mode has its own characteristics. The anti-virus installed on the computer will not record such a launch of the update utility. The databases and components will be updated, but the main control anti-virus service "will not find out" about it. Similarly, only using the update utility log can you find out whether the updating process occurred correctly. It follows from this that when using a similar way to update the product, you may receive the error "The virus databases are outdated", when in fact they will be updated. This feature is related to the anti-virus architecture. Launching the update utility separately from the control services is a process that is required only for service purposes.
Usually, it is recommended that you use the standard way to update via the interface.
What are the features of the updating process for certified Dr.Web versions?
Certified versions can be updated using one of two methods:
- Via the mirror created by a certified version of the product.
- Using the drwzones.xml file that leads to certified zones.
Versioning and the originality of files is very important if a certified product is installed on an isolated computer. Updating a certified version via the mirror that was created by the actual (release) version of the anti-virus will change the checksums of the executable files and lead to the loss of Information Security System certification status. The drwzones.xml file, taken from the anti-virus that was installed from a certified distribution, will contain its own update zone. During the mirror creation process, it will be used to load database and component updates. Using a release drwzones.xml will lead to the loss of the certified status.
How is file integrity ensured during transfer?
To minimise the risks of damaging files when transferring them manually to the directory from which updates will be downloaded, we recommend using a file manager with a binary data transfer mode when transferring a folder. An alternative solution is to transmit files in an archive.
Updating the anti-virus on a PC that has no Internet access
Install the non-centrally managed version of Dr.Web by using the User Manual (the installation instructions for versions below 12.0 can be found here).
- How is the update source configured on a target PC via the anti-virus interface?
- How is the update mirror configured manually?
Update the anti-virus on computers, using the obtained repository.
Nothing found