Lists of frequently asked questions
Dr.Web for Linux
How to add a site to SpIDer Gate's exclusions list for Linux
Open the Dr.Web settings.

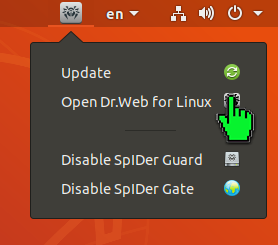
Click on the gear icon.

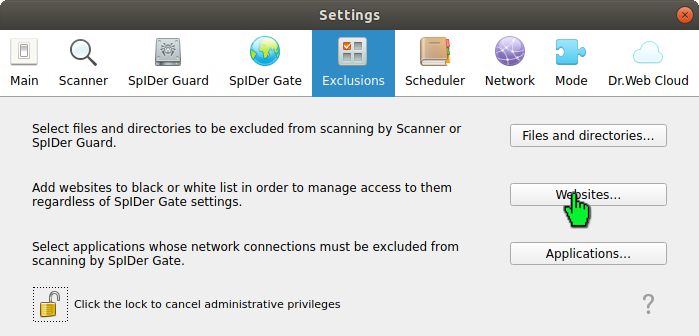
Open the "Exclusions" section and click on the padlock icon.

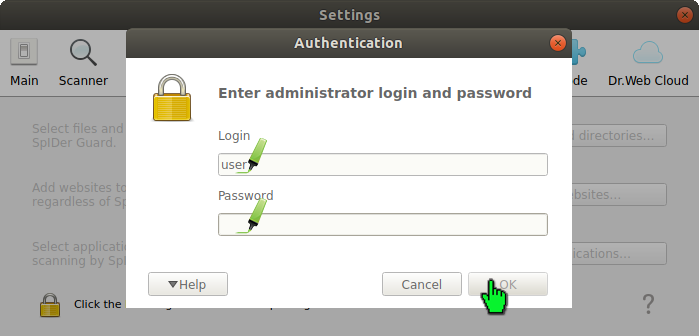
Enter the administrator login and password, and then click on "OK".
Click on "Websites".
Enter the URL to which you want to allow access and then click on the "Allow" button. The URL will be added to the white list.

Click on "OK" once all the addresses you need have been added to the white list.

Dr.Web Security Space for Windows supports the use of masks when URLs are specified, but in this case, that capability is absent. Therefore, site addresses and not segments of their names should be added to the white list.
Updating Dr.Web on computers without Internet access
What is the update mirror?
The update mirror is the folder to which virus database and anti-virus component update files are copied. The update mirror can be used as the Dr.Web update source for other local network computers that are not connected to the Internet.
The utility that creates the update mirror can be used on computers that do not have the Dr.Web anti-virus installed on them or on computers that have Dr.Web products of a different type and/or version installed on them.
Users do not need to create a mirror in order to update Dr.Web on a computer that has the ability to download the required updates from an external network. In this case, it is recommended to carry out the standard updating routine:
Getting started
Getting started
The process of creating a mirror with the utility begins with finding and copying the files necessary for this procedure. To do this, the below files must first be copied from a PC whose standalone antivirus needs updating to a target PC that has access to the external network.
- The Dr.Web license key file.
- For users of commercial licenses for business products: agent.key
- For users of home versions: drweb32.key
The key file can be downloaded from the email received after the serial number’s initial registration.
- The file with the zone.ini or update.drl update zones for the group of resources that you need to download. Unlike .drl files, .ini files contain multiple mirror URLs, which allows a backup mirror to be used when the main one is unavailable.
Typical paths for the required resources:
| Resources | Linux-like operating systems | FreeBSD |
|---|---|---|
| Key file | /etc/opt/drweb.com/drweb32.key | /usr/local/libexec/drweb.com/bin/drweb32.key |
| The directory containing the virus databases | /var/opt/drweb.com/drl/b ases | /var/drweb.com/drl/bases |
| The directory containing the anti-spam databases | /var/opt/drweb.com/drl/a ntispam | /var/drweb.com/drl/antis pam |
| The directory containing the databases of unwanted sites | /var/opt/drweb.com/drl/d ws | /var/drweb.com/drl/dws |
Each of the files specified in the directory table contains zone.ini and update.drl, one of which should be copied (together with the key file) to the PC where the utility is going to be used to download the databases.
To determine the current paths to the directories containing databases, execute the following commands.
For the virus databases:
$ drweb-ctl cfshow Update.BaseDrlDir
For the anti-spam databases:
$ drweb-ctl cfshow Update.AntispamDrlDir
For the databases of unwanted sites:
$ drweb-ctl cfshow Update.DwsDrlDir
Downloading databases
Download the Dr.Web utility fromDoctor Web's official site to create a local update mirror and go to the directory containing the utility in the console or terminal emulator.
Examples of commands from the text below will differ from each other depending on the OS and configuration used.
In the examples below, the utility is run on Linux; the required resources (key file and .ini files) are located in the same directory as the utility; and the updates are saved in the /tmp/updates directory. You can specify any other directory for saving updates if you have the rights to write into it. If the specified folder does not exist, it will be created during the resource download process. For clarity, let's rename the zone.ini files for the different groups of resources used in the example, in bases.ini, antispam.ini, and dws.ini.
Allow the launch of the utility:
$ chmod +x drweb-mirror-11.1-linux-amd64
Required parameters: --path, --key, any of the keys --bases-drl, --bases-ini, --antispam-drl, --antispam-ini, --dws-drl, --dws-ini and the path to the corresponding .drl or .ini file.
The optional --arch parameter specifies the target architecture for which updates are downloaded. By default, it matches the architecture of the computer that executes the command with this parameter. If updates are intended for a computer with a different architecture, specify it after this parameter.
Download the virus databases:
$ ./drweb-mirror-11.1-linux-amd64 --path /tmp/updates --key drweb32.key -bases-ini bases.ini
Download the anti-spam databases:
$ ./drweb-mirror-11.1-linux-amd64 --path /tmp/updates --key drweb32.key -antispam-ini antispam.ini
Download the databases of unwanted sites:
$ ./drweb-mirror-11.1-linux-amd64 --path /tmp/updates --key drweb32.key -dws-ini dws.ini
Updating Dr.Web on computers without Internet access
Copy the update directory to the computer whose anti-virus needs updating and then execute the following command:
# drweb-ctl update --from /tmp/updates
Command line parameters
A complete list of command line parameters can be found in the official documentation。
Nothing found